I love October. Not only is the weather getting cooler but it’s the month of my birthday. It’s also the month I started dating and later got engaged to my husband. Oh, and who can forget about Halloween? Overall, when October rolls around, I get excited. And this year is no different.
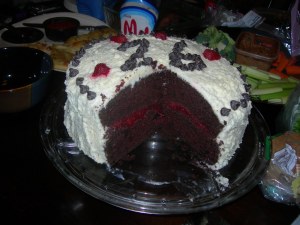
In fact, this year’s October will be pretty spectacular in its own right. My cousin is getting married, we will be camping at a state park with friends, another friend is coming to visit, and we had some friends over for a casual birthday party for me. And I made the cake completely from scratch and it tasted and looked great.
I found the recipe for the strawberry filling and whipped cream icing in The Good Taste Collection: A Second Serving which was published in 1991 in Victoria, Texas along with a white cake recipe, but I wasn’t so sure I wanted to try to make cake flour (yes you can do that with your all-purpose flour) or figure out how to mess with just egg whites. Besides, I thought that a chocolate cake (recipe found in a Betty Crocker cookbook) would contrast nicely with the icing and filling, so I went with that instead. As a combination it made for a dense chocolate cake, a thick strawberry filling, and a light texture and tasting icing.
Chocolate Cake
I was a little more impressed with the batter than the finished product, but I think that is more because my preference for cakes is changing to white. At any rate, the only real problem I had with it was getting it out of my 9 inch round pans. However, I just put the stuck pieces back on the cake since it was going to be hidden by filling and icing anyway.
Ingredients:
- 2 1/4 c. organic all-purpose or 2 1/2 c. cake flour (I used all-purpose)
- 1 2/3 c. sugar
- 3/4 c. organic butter, softened
- 2/3 c. organic baking cocoa
- 1 1/4 c. water
- 1 1/4 tsp. baking soda
- 1 tsp. salt
- 1 tsp. organic vanilla extract
- 1/4 tsp. baking powder
- 2 large organic eggs
Directions:
- Heat oven to 350 degrees. Grease bottom and sides of two 9 inch round pans and lightly flour.
- In large bowl, beat together all the ingredients (that’s right, absolute mayhem – go for it!) by hand or with electric mixer on low speed for 30 seconds, then on high for 3 minutes. Scrape side of bowl occasionally of course. Pour into pans.
- Bake the two 9 inch round pans for 30 – 35 minutes or until toothpick inserted in one comes out clean. Cool for 10 minutes or so before attempting to remove to wire cooling rack. Good luck.
- Cool completely, about 1 hour, before attempting any frosting.
Strawberry Filling
This recipe is extremely simple in regards to the type and amount of ingredients and the directions for making it. I imagine it can be used with a variety of fruit (if you test this, let me know how it works out for you). I used organic frozen strawberries and organic, non GMO cornstarch.
Ingredients:
- 1 package (10 oz.) organic strawberries, thawed
- 1/4 c. sugar
- 3 Tbs. organic cornstarch
- 2 Tbs. Grand Marnier (optional; I did not use it)
Directions:
- Combine strawberries, sugar, and cornstarch in medium saucepan; stir well.
- Cook over medium heat until thick, stirring constantly.
- Stir in Grand Marnier.
- Cool.
Whipped Cream (for icing)
Overly sweet icing makes me queasy, so I thought I would go with this instead. If you mix it by hand, it takes somewhere between a few minutes and ten and will be a great workout for your arm. Otherwise, a mixer works great. I upped the amount from 1 1/2 c. and 3 Tbs. because I found that the original amount was not enough to fully ice the cake. I used organic whipping cream.
Ingredients:
- 2 c. whipping cream
- 4 Tbs. sugar
Directions:
- Whip cream, adding sugar about a teaspoon at a time (I did it by the Tablespoon), until firm.
- Cover cake and garnish top and edge with halves strawberries (I just garnished the top of mine).
Putting it All Together
1 ) If you are using a pedestal or some other pretty and decently flat cake, then put one of the rounds on it first.
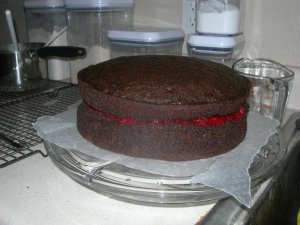
2 ) Tear a few pieces of wax paper into strips and slide under the cake on about four sides (or more, depending on the length of the strips – you want the cake surrounded by wax paper on all sides). What this does is keeps your plate clean of icing, and allows you to not be so meticulous when icing the bottom of the sides.

Notice how the wax paper is sticking out and completely surrounds the cake. Also, check out how beautiful the strawberry filling looks. Yum.
3 ) Next, use a spoon or small spatula to spread the strawberry filling on the cake. I tried to spread a thin layer everywhere to hold down the crumbs and pieces I put back on the cake from the pan (I left the bottom cake upside down). I then spread a thicker layer everywhere, keeping it close but a little bit back from the edge as you can see in the picture above. My filling was not runny, so I did not make an icing dam like some recipes suggest. If you want to do this, then keep the icing back about half an inch or more from the edge and fill in the rest with the icing.
4 ) I then put the other cake (top side up) on the filling.
5 ) Now comes the messy part – putting on the icing. You can do this one of two ways: put a base layer on the cake, stick it in the fridge for a little while until the icing hardens up, then bring it back out to put on the rest or be impatient and put a base layer on to keep down the crumbs and then immediately proceed with the rest of the icing. I chose to do the latter.
6 ) Once you have the first layer on, you can start adding on the rest of the icing. I started on the top and then the sides, rotating the pedestal as needed. You may need to kneel on something or raise the cake up onto a higher counter so you can get at a better angle for this.
7 ) Once you have the icing on, then use the spatula to smooth it out or add designs as desired.
8 ) Since this was my birthday cake, I “wrote” my age on top in semisweet chocolate chips and edged the top with them as well, placing a couple of halved strawberries on top for a dash of color. Really you can do whatever you want – strawberries, chocolate chips, chocolate curls, etc.
9 ) Place in refrigerator until shortly before serving.
10 ) Enjoy!
What type of cake do you make/purchase for your birthdays?


The chocolate cake with strawberry filling looks great!! Wished I could had tasted it!!! Bummer!!!
It bothers me that there is a bottle of Miracle Whip in the picture of the piece of cake…..interesting combination. Jk. It looks really good.
Yeah, I would have preferred the Miracle Whip to not be in the picture, but that’s what I get for not paying close enough attention. 😛 But I can honestly say not one guest put it on the cake instead of their burger. 😉 🙂